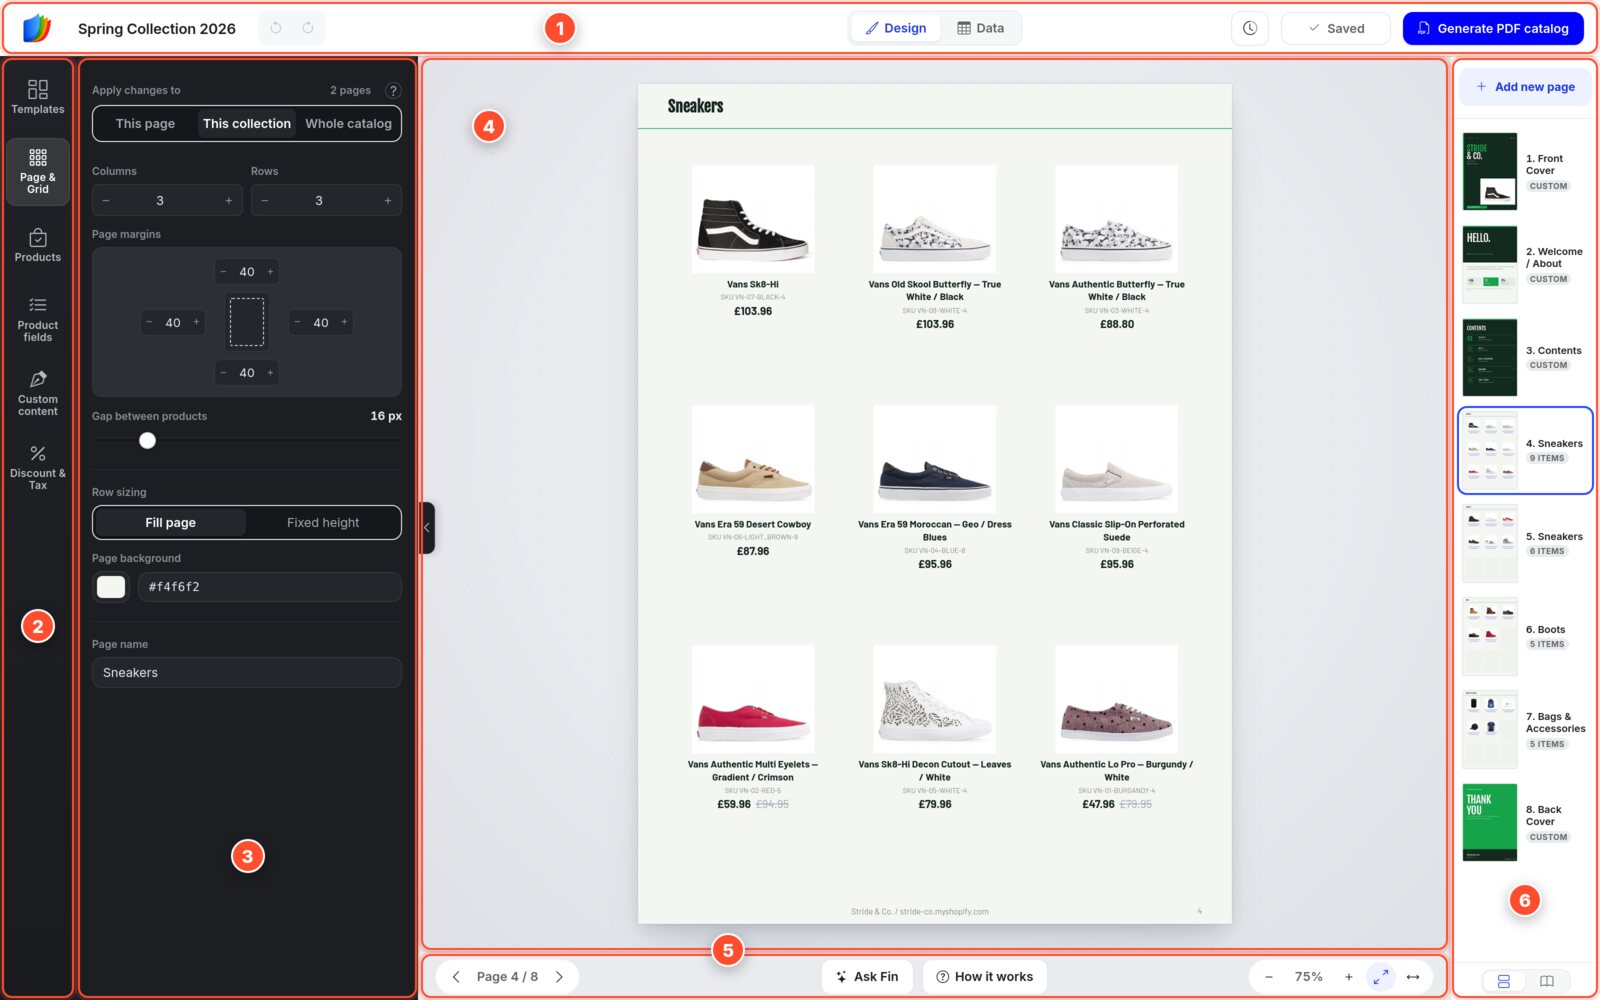
Every screen explained with screenshots: the layout, importing products, styling, discounts, saving, the PDF and your share links.
See every step in action
Narrated and captioned. Use the chapters under the video to jump to any step.
Read the transcript
0:00 Introduction
In this tutorial, you'll build a catalog from a template, style it, and generate a PDF. We'll use the Outdoor & Adventure design kit.
0:10 Choose a template
Click Templates in the main menu. Design kits give you a complete look with real photos. Search for hiking, and Outdoor & Adventure shows up. Click it. The Start with a template window opens. Pick one of the seven cover styles. The welcome and contents pages are already selected. Add Best Sellers and Featured Product. Choose a product grid, like 3 × 3. Then name your catalog, check the paper size, and click Create catalog.
0:42 Get to know the editor
The editor opens on your first product page. The icons on the left open your tools: Templates, Page & Grid, Products, Product fields, Custom content, and Discount & Tax. Your pages are listed on the right.
0:58 Add your products
Click Products, then the Inventory tab. Click a product to place it. Or click Bulk import products, pick a collection, and click Import collection. Your products take the kit's style, and new pages are added when a page is full.
1:14 Style the product pages
In Page & Grid, set the columns, rows, margins and spacing. Click the header or footer on the page to edit it. At the top, Apply changes to lets you pick This page, This collection, or Whole catalog. Click a product to style its card, or click one field, like the title or price. Change the font, size and color for This product, This page, or Whole catalog. Product fields shows or hides details, like the SKU. To edit a title or price, switch to Data.
1:49 Edit content pages
Now open a content page, like the cover. Double-click any text to type your own, and drag things to move them. Select something, and its settings open on the left. To swap a photo, double-click it and pick your image. Custom content adds text, shapes, badges, images and QR codes. In Images, search products by name to add a product photo to the page.
2:15 Colors and pages
For a different look, open Colors in Custom content. Choose This page or Whole catalog, then click Shuffle colors until you like it. Your photos and fonts stay the same. Click Add new page and pick any page from the kit. It goes after the current page. Drag pages on the right to reorder them. Nothing saves automatically, so click Save as you go.
2:43 Generate your PDF
When you're ready, click Generate PDF catalog. Standard quality is fine for sharing. For printing, pick Best quality, and add a 3 mm bleed if your print shop asks. Click Generate PDF. The Catalogs page opens, and in a few minutes the card shows Published. Download the PDF, or share the Showcase link as a flipbook.
3:07 Wrap-up
That's it, from template to finished PDF. If you get stuck, click Ask Fin, under the page, and ask anything.
Getting started
Open Templates, pick a design kit or an industry page set, choose your paper size, and click Create — the catalog opens in the Grid editor with pages already designed. Import your products, drop them into the grid, and click Generate PDF catalog.
Prefer building page by page? Use the Standard editor at /newDesign instead.
The Grid editor (via Templates) is the fastest way: start from a designed template, each page has its own product grid, and PDF export is one click. The Standard editor (/newDesign) is the page-based editor with collection import, per-field styling and Canva-style free elements.
An Advanced editor also exists for catalogs that were built with it — you can keep editing those at /new-catalog-design.
Open Catalogs in the sidebar. Every catalog shows its status (ready, generating, draft), its share links, and actions like edit, download and delete. Catalogs created in any editor appear there once published.
Yes — watch the quick video tutorial for a start-to-finish run through creating and sharing a catalog.
Importing products
In the Grid editor, click Products in the left sidebar, open the Inventory tab and click Bulk import products — pick one or more collections and they flow onto your pages automatically (step-by-step guide). In the Standard editor, click Import Products and pick one or more collections; turn on "Start each collection on a new page" to keep collections separated.
Yes — in the Standard editor choose your B2B catalogs when importing. You can select several at once: each B2B catalog becomes its own section in the catalog, priced with its own price list and discount.
Use Sync — on the catalog card or inside the editor — to re-import the current prices, stock and images from your store, keeping your layout and styling intact. Then regenerate the PDF so the shared files are up to date.
Yes — the Standard editor can load both product and variant metafields. Add them from the metafield selector when importing or editing, then show or hide each one in the Product Fields panel, with custom labels if you like.
Yes. Standalone accounts import products from a CSV file (with column mapping) or add them manually, in both the Grid editor and the Standard editor. A Shopify store is not required to build and share catalogs.
Editing your catalog
Every page has its own grid — change rows and columns per page, drag products between slots, and pages reflow automatically without losing products. Style product cards for the whole catalog, a single page, or one card. Cover and content pages from your template kit are freely editable too.
New to the editor? The grid editor guide walks through every screen with screenshots.
The left toolbar holds the main panels: Products (import and place), Layouts (grid presets or your own rows × columns), Grid settings (card layout, images, margins, header/footer), Product Fields (which fields show) and Elements (shapes, text, images).
Click any field on the page and use the Properties panel on the right to style it. The Apply to selector applies a change to all pages, same-layout pages, or just the current page.
In the Standard editor open Product Fields and toggle on Barcode or QR Code. Barcodes generate automatically from the product's barcode field or SKU (CODE128, EAN13, EAN8, UPC, CODE39, ITF14); QR codes link to the product page. Click the element on the page to adjust size and colors.
In the Standard editor use the page bar at the bottom to add, duplicate or reorder pages, and the Custom text, Elements and Background panels to design covers and content pages Canva-style. In the Grid editor add cover and content pages from your kit's page layouts and edit their text and images directly.
The Standard editor saves automatically as you work (and with Ctrl+S) and keeps version history — click the clock icon to restore an earlier version. In the Grid editor, click Save in the top bar or press Ctrl+S — it does not save by itself, and the button turns amber (Unsaved) while changes are waiting. Every save is kept in Version history (the clock icon, 5 newest), and your catalog is also saved whenever you generate the PDF.
Grid editor: click Generate PDF catalog — you're taken to Catalogs while it renders, and the card flips to ready with the download and share links. Standard editor: click Export PDF, choose a quality (Draft, Standard, High or Best — up to 300 DPI for print), and the PDF is generated on our servers.
Sharing & order forms
Uploading an existing PDF
Yes. If your catalog already exists as a PDF file, the app built for it is CatalogZine: PDF to Flipbook — our second Shopify app, free to install — which turns the PDF into an interactive flipbook with Add to Cart hotspots and embeds it on your storefront. See this page for the details. Uploading a PDF inside EasyCatalog itself still works too, at this page: it's published immediately and gets the same wholesale, retail, showcase and PDF share links as catalogs made in the editors.
Click Edit on the uploaded catalog to open the hotspot editor. Click anywhere on a page to place a cart button, drag it into position, resize it with the size slider, and link it to a Shopify product or variant — optionally with a custom price. The buttons appear in the wholesale and retail flipbooks and open the order popup when clicked.
On the Free plan you get 1 uploaded catalog with up to 5 cart buttons, and shared flipbooks carry a small "Made with EasyCatalog" badge. Basic allows 3 uploaded catalogs and PRO 5; higher plans are uncapped. Upgrade to raise the limits.
Orders & emails
On the Orders page. Open an order to see the items and customer details, mark it paid or fulfilled, or push it to Shopify as a draft order. You and the customer each receive an email notification when an order is placed.
Yes — open Email settings. Edit the customer confirmation email's subject, heading, intro and footer, plus the subject of the "New order" email you receive. Placeholders like {order_id}, {store_name}, {customer_name} and {total} are filled in automatically.
Global defaults live in Order form settings. Per-catalog behavior — wholesale rules, retail field visibility and passwords — lives on the catalog cards in Catalogs.
Plans & limits
Basic allows 100 products per catalog and PRO allows 500; Unlimited and Enterprise plans have no per-catalog cap. If you go over the cap, the catalog is saved as a draft and you'll see an upgrade prompt instead of a generated PDF.
Enough to try everything: build catalogs, export PDFs and share order forms, with tighter caps — fewer catalogs, 1 uploaded PDF catalog with 5 cart buttons, and a watermark on uploaded-catalog flipbooks. Without Shopify, the Free plan gives you one catalog with no page limit while you build; its PDF includes the first 5 pages with a small watermark, and the catalog is final once generated. Paid plans remove those limits.
Open the Upgrade page to compare plans and switch — charges go through your Shopify bill (standalone accounts pay by card). The upgrade applies immediately.
Try different keywords, or ask us directly below.